
If you’re dealing with faded lettering, dealer stickers, or a previous owner’s “custom” emblem, you’re not alone — car badges UK searches spike whenever people buy used cars, debadge for a cleaner look, or replace stolen emblems. The good news is you can remove old badges cleanly at home without harming your paint, as long as you use the right heat, the right technique, and a little patience.
- What are car badges, and why do they leave marks?
- Before you start: a quick safety check for modern sensor badges
- Tools you’ll need for removing badges without paint damage
- Car badges UK method: the safest step-by-step removal process
- A quick comparison: what works best (and what to avoid)
- Why badges sometimes tear paint (and how to prevent it)
- Real-world scenarios: choosing the right approach
- Featured-snippet checklist: “How do you remove a car badge without damaging paint?”
- Common questions people ask about car badges in the UK
- Conclusion: car badges UK removal without the stress
This guide walks you through the safest methods, what to avoid (so you don’t peel clear coat), and what to do when you’re left with that annoying “ghost” outline after the badge comes off.
What are car badges, and why do they leave marks?
Car badges UK are typically stuck on with automotive-grade double-sided foam tape. Over time, UV light, washing chemicals, and temperature swings harden the adhesive. When you remove the badge, you can end up with:
- Adhesive residue (sticky, grey, or rubbery)
- A clean outline where the paint under the badge is less weathered (“ghosting”)
- Micro-marring (fine scratches) from scraping with the wrong tool
Modern clear coats are not infinitely thick. One UK detailing training resource notes modern clear coat depth can be roughly 32–102 microns, and even machine polishing removes measurable material (often 2–3 microns with typical correction). That’s why “just scrape it off” is a bad plan.
Before you start: a quick safety check for modern sensor badges
Some newer vehicles hide radar sensors behind the front emblem (common on VW, Mercedes, BMW and others). These can be expensive and are frequently targeted by thieves; UK reporting has highlighted thefts where radar units embedded in badges can cost up to ~£1,500+ to replace in some cases.
If the badge you’re removing is on the front grille area and your car has adaptive cruise control / collision assist, treat it as a sensor badge. In that case:
- Don’t pry from the front with metal tools
- Avoid aggressive solvents
- Consider professional help if you’re unsure (especially if recalibration might be required)
For normal rear boot-lid model badges, you’re usually safe to DIY.
Tools you’ll need for removing badges without paint damage
You don’t need a full detailing studio, but you do need the right basics.
Recommended:
- Hair dryer (safer than a heat gun for beginners)
- Dental floss or fishing line (the “sawing” tool)
- Microfibre towels
- Automotive-safe adhesive remover (paint-safe products exist—follow label directions)
- Mild car shampoo and water
- Clay bar (optional, great for final cleanup)
- Finishing polish + soft applicator (hand polish works)
Avoid:
- Razor blades, screwdrivers, metal scrapers
- Household paint thinners (too risky on clear coat)
- High heat held in one spot
Car badges UK method: the safest step-by-step removal process
Step 1: Wash the area first
Wash and dry the panel. Dirt trapped under floss or under your fingers can create scratches while you work.
Shortcuts here usually cost you extra polishing later.
Step 2: Warm the badge (don’t cook the paint)
Heat softens adhesive so it releases instead of tearing.
- Use a hair dryer on medium/high and warm the badge for 60–120 seconds.
- Keep moving the airflow so you don’t overheat one spot.
Heat guns can work, but they can also get extremely hot. Many models are capable of very high temperatures (some over 500°C on the top setting), which is far beyond what you want near clear coat. If you insist on a heat gun, use a low setting, keep distance, and keep it moving.
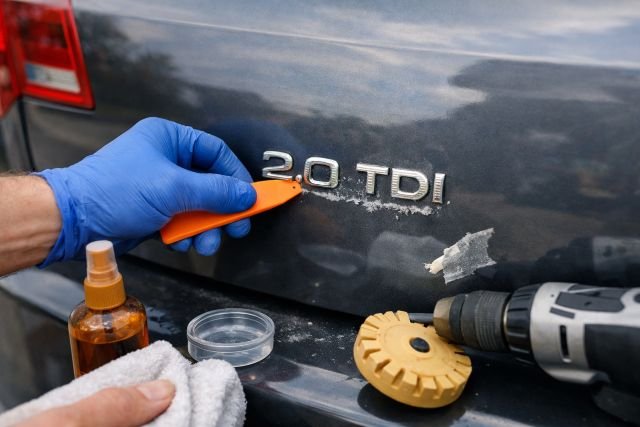
Step 3: “Saw” behind the badge with floss or line
Slide floss behind one edge of the badge. Use a gentle sawing motion while pulling the floss parallel to the paint, not outward.
If it feels stuck:
- Add more heat
- Switch to fishing line (stronger)
- Go slower
This is the step that prevents paint damage. You’re cutting adhesive, not prying the badge off the panel.
Step 4: Remove leftover adhesive safely
Once the badge is off, you’ll see tape residue. Don’t scrape it.
Do this instead:
- Warm the residue lightly again.
- Use your thumb to roll adhesive into “boogers” (it works).
- Apply an automotive adhesive remover to a microfibre and wipe gently, turning the towel often.
Some adhesive removers are designed for use on painted automotive surfaces when used as directed. Always do a small spot test first (especially on repainted panels).
Step 5: Clean, decontaminate, then assess “ghosting”
After residue is gone:
- Wash the area again or wipe with a paint-safe panel wipe
- Optional: clay the area if it feels gritty
Now look at the panel from an angle in daylight. If you see a shadow outline, that’s usually oxidation/fading around the badge, not “missing paint.”
Step 6: Polish the area (gentle first)
For light ghosting:
- Start with a finishing polish by hand using a soft foam applicator
- Work a slightly larger area than the outline to blend
Because clear coat removal is real (even if small), don’t jump straight to aggressive compounds. A reputable UK detailing training PDF notes polishing removes measurable microns. The goal is the least abrasion that gets the finish even again.
A quick comparison: what works best (and what to avoid)
| Method | Paint safety | Best for | Common mistake |
|---|---|---|---|
| Hair dryer + floss | Very safe | Most rear badges | Not heating enough |
| Heat gun + line | Medium (depends) | Stubborn badges | Holding heat in one spot |
| Adhesive remover | Safe if used correctly | Tape residue | Soaking edges/trim |
| Plastic scraper | Medium | Thick residue | Pressing too hard |
| Razor/metal tool | High risk | Almost never | Clear coat gouges |
Why badges sometimes tear paint (and how to prevent it)
Paint damage usually happens for one of three reasons:
The car has been repainted
Body shop paint can be perfectly good, but edges and clear coat adhesion vary depending on prep. If the panel was resprayed, old badge adhesive might bond differently.
Prevention: Use less heat, more patience, and avoid pulling outward.
The adhesive is brittle from age
Older foam tape can fracture, leaving sharp bits that tempt you to scrape.
Prevention: Reheat frequently and use adhesive remover to soften residue.
Someone used the wrong tool
A single slip with a blade can cut through clear coat instantly.
Prevention: Floss/fishing line is your “damage insurance.”
Real-world scenarios: choosing the right approach
Scenario 1: You’re removing a dealer badge on a 5–10-year-old hatchback
This is the easiest job. Hair dryer + floss usually removes it cleanly. Expect mild residue and light polishing after.
Scenario 2: You’re debadging a black car
Black paint shows everything — micro-marring, haze, and uneven gloss.
Plan to finish with a gentle polish and clean microfibres. You’ll get a better result if you polish a wider blending area.
Scenario 3: Your front emblem is a sensor badge
If your vehicle has adaptive cruise control, assume the badge may be part of the radar system. UK reporting has highlighted how quickly thieves can remove these and how costly replacements can be.
If you’re removing it for replacement, consider having the replacement fitted professionally to avoid alignment issues.
Featured-snippet checklist: “How do you remove a car badge without damaging paint?”
Definition: The safest way to remove a car badge is to warm the adhesive with gentle heat, cut through the tape using dental floss or fishing line, then dissolve residue with a paint-safe adhesive remover and finish with light polishing.
Fast steps:
- Wash and dry the area
- Warm badge with hair dryer
- Saw behind it with floss/line
- Remove residue with adhesive remover
- Wash again
- Light polish to remove ghosting
Common questions people ask about car badges in the UK
Will removing badges reduce my car’s resale value?
In the UK, it depends on the buyer. Some buyers love a clean debadged look; others want factory originality. If you’re unsure, remove only dealer badges and keep model badges.
How do I remove the “shadow” outline after debadging?
That outline is usually uneven UV exposure and oxidation around the badge. Start with a finishing polish. If it’s stubborn, step up gradually — but remember clear coat is finite.
Can I use WD-40 to remove badge glue?
Some people do, but it’s not designed as a dedicated automotive adhesive remover. A product made for automotive adhesives is a safer bet when used as directed.
Is badge theft actually a thing in the UK?
Yes, and it’s not only the badge — front emblems can house radar sensors that are valuable. UK reporting has described theft patterns and high replacement costs. Broader vehicle theft remains a major UK issue too; ONS publishes official material and related FOI releases on theft and break-ins.
Conclusion: car badges UK removal without the stress
Removing old emblems is one of the most satisfying “small upgrades” you can do — when you do it safely. The best approach for car badges UK owners is simple: gentle heat, floss or fishing line to cut the tape, a paint-safe adhesive remover used as directed, and a light polish to blend any ghosting.
Take your time, avoid scraping, and be extra cautious with modern front sensor badges. Done right, you’ll get a clean, factory-fresh finish — without damaging your paint.